[실습] IoT 웹 사용자 인터페이스에서 온습도 센서 모니터링
필기자
2024-05-27 18:06
6,655
0
본문
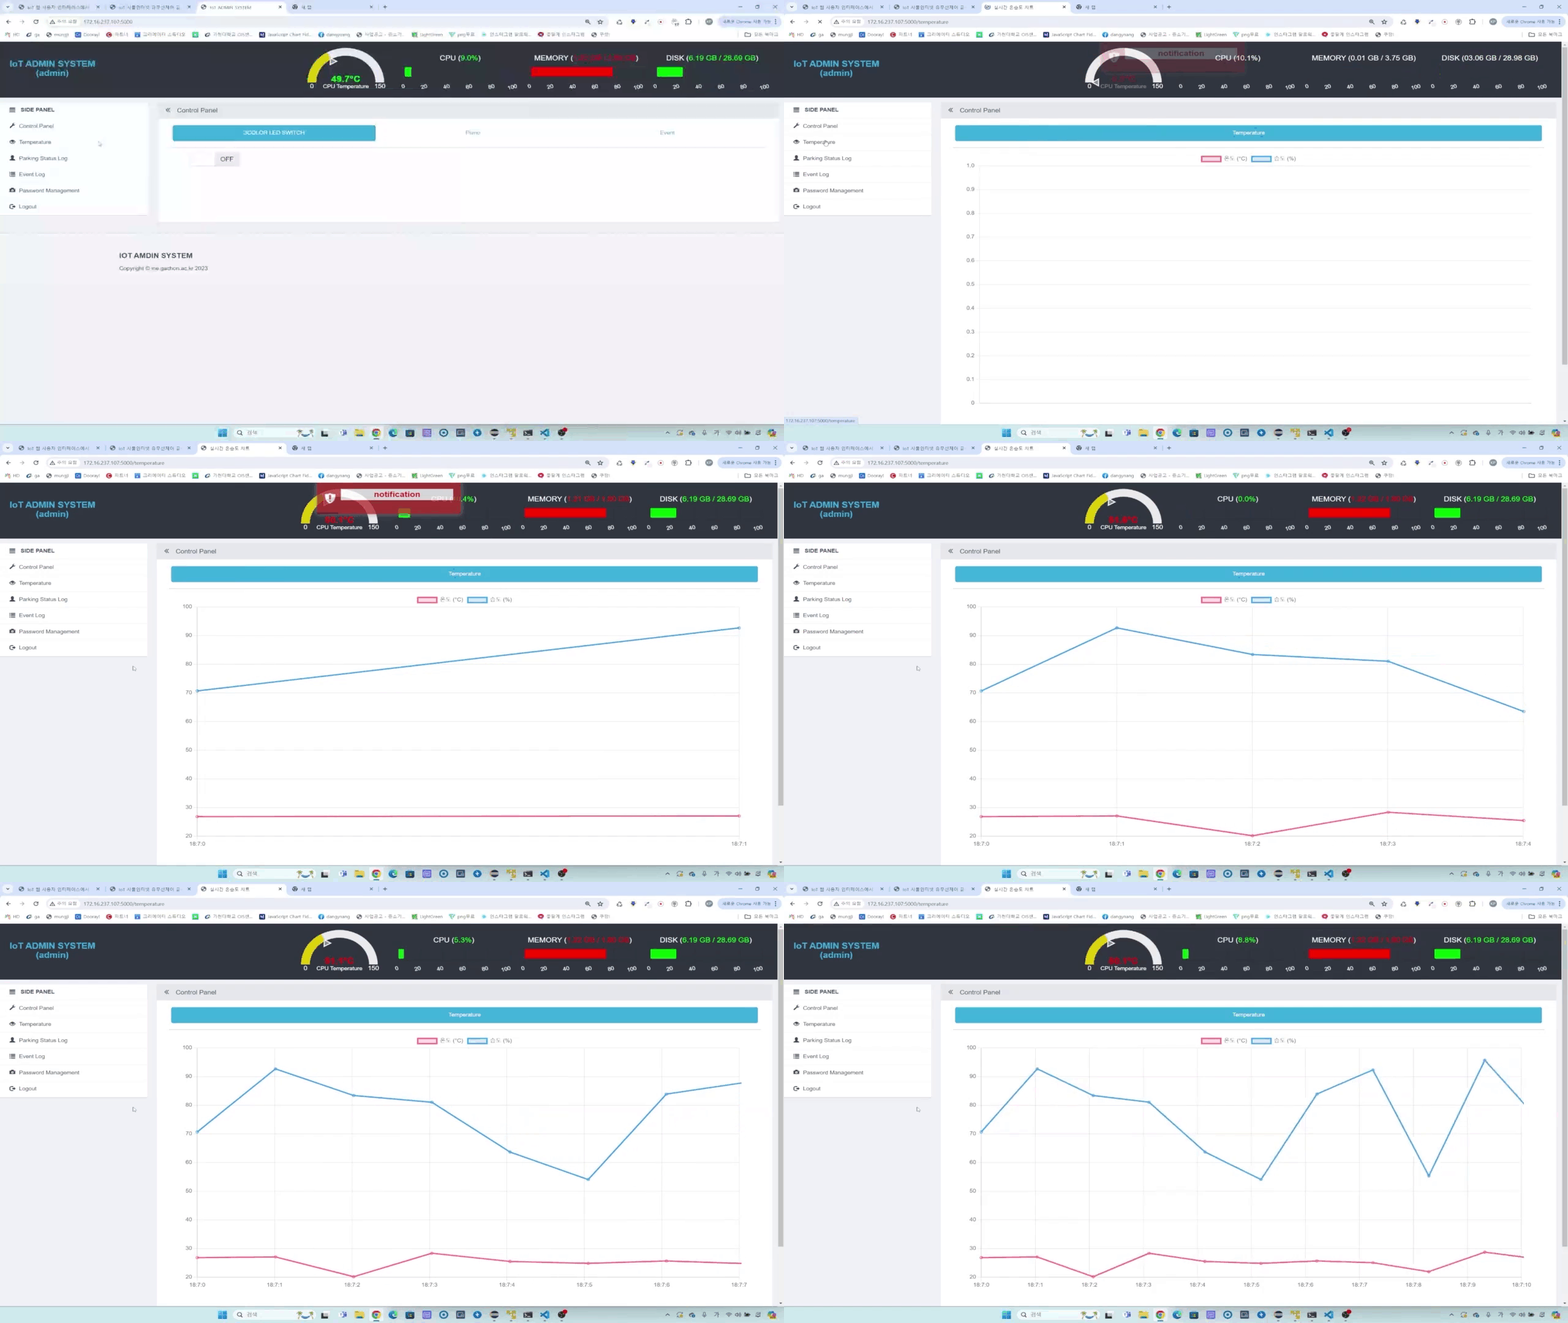
IoT 웹 사용자 인터페이스에서 온습도 센서 모니터링
- /home/pi/iot/html/menu.html
- 기존 메뉴 코드에 Tab 화면 수정 코드 추가
- 기존 화면을 활용하여 온습도 모니터링 탭 추가
- <li class="list-group-item cctvview"><a href="/temperature"><i
class="glyphicon glyphicon-eye-open"></i>Temperature</a></li>
- 기존 메뉴 코드에 Tab 화면 수정 코드 추가
<div class="col-xs-6 col-sm-3 sidebar-offcanvas" role="navigation">
                <ul class="list-group panel">
                    <li class="list-group-item"><i
                        class="glyphicon glyphicon-align-justify"></i> <b>SIDE PANEL</b></li>

                    <li class="list-group-item camera_mg"><a href="/"><i
                            class="glyphicon glyphicon-wrench"></i>Control Panel</a></li>
                    <!-- SIDE PANEL에 온습도 모니터링 탭 추가 -->
                    <li class="list-group-item cctvview"><a href="/temperature"><i
                            class="glyphicon glyphicon-eye-open"></i>Temperature</a></li>

                    <li class="list-group-item parkingstatus" ><a href="/parkingstatus"><i
                            class="glyphicon glyphicon-user"></i>Parking Status Log</a></li>
                    <li class="list-group-item eventlog"><a href="/eventlog"><i
                            class="glyphicon glyphicon-list"></i>Event Log</a></li>
                    <li class="list-group-item passfrom"><a href="/passfrom"><i
                            class="glyphicon glyphicon-camera"></i>Password Management</a></li>
                    <li class="list-group-item"><a href="/logout"><i
                            class="glyphicon glyphicon-log-out"></i>Logout</a></li>
                </ul>
            </div>
- /home/pi/iot/html/temperature.html
- 온습도 모니터링 html 코드 생성
<!DOCTYPE html>
<html lang="ko">
<head>
<meta charset="utf-8">
<title>실시간 온습도 차트</title>
<meta name="viewport"
content="initial-scale=1, maximum-scale=1, user-scalable=no">
<link rel="shortcut icon" href="favicon_16.ico" />
<link rel="bookmark" href="favicon_16.ico" />
<!-- site css -->
<link rel="stylesheet" href="static/dist/css/site.min.css">
<link rel="stylesheet" href="static/mdi/css/materialdesignicons.min.css">
<link rel="stylesheet" href="static/lib/css/jquery-ui.min.css">
<link rel="stylesheet" href="static/lib/css/dataTables.bootstrap.min.css">
<link rel="stylesheet" href="static/lib/css/toastr.css?var={{rand}}">
<link rel="stylesheet" href="static/lib/css/piano.css?var={{rand}}">
<script type="text/javascript" src="static/dist/js/site.min.js"></script>
<script src="static/lib/js/jquery-ui.min.js"></script>
<script src="static/lib/js/toastr.min.js"></script>
<script src="static/lib/js/konva.js"></script>
{% include 'common/css.html' %}
<!-- bootstrap-switch 추가 -->
<link rel="stylesheet" href="https://cdnjs.cloudflare.com/ajax/libs/bootstrap-switch/3.3.4/css/bootstrap3/bootstrap-switch.min.css">
<script src="https://cdnjs.cloudflare.com/ajax/libs/bootstrap-switch/3.3.4/js/bootstrap-switch.min.js"></script>
<!-- bootstrap-switch 추가 -->
</head>
<body>
<!-- https://www.w3schools.com/bootstrap/default.asp -->
<!--header + top-->
{% include 'top.html' %}
<!--header + top end-->
<!-- 3단중 중단(사이드 메뉴와 본문) -->
<div class="container-fluid">
<!--documents-->
<div class="row row-offcanvas row-offcanvas-left">
{% include 'menu.html' %}
<div class="col-xs-12 col-sm-9 content">
<div class="panel panel-default">
<div class="panel-heading">
<h3 class="panel-title">
<a href="javascript:void(0);" class="toggle-sidebar">
<span class="fa fa-angle-double-left" data-toggle="offcanvas" title="Maximize Panel"></span>
</a>
Control Panel
</h3>
</div>
<div class="panel-body">
<!-- Tab Menu -->
<div class="col-md-6">
<ul id="myTab" class="nav nav-pills nav-justified">
<li class="active"><a href="#Temperature" data-toggle="tab">Temperature</a></li>
</ul>
</div>
<!-- Tab Menu End-->
<div id="myTabContent" class="tab-content col-md-12">
<div class="tab-pane fade active in" id="Switch">
<div class="tab-content col-md-12" style="border-top: 1px solid #80808069; padding-top: 10px;">
<div class="content-row">
<canvas id="tempChart"></canvas>
<!-- row -->
</div>
<!-- content-row -->
</div>
<!--tab-content-->
</div>
<!-- Event end-->
</div>
<!-- myTabContent end -->
</div>
<!-- panel body end-->
</div>
<!-- panel panel-default end -->
</div>
<!-- content -->
</div>
</div>
<!-- 3단중 중단(사이드 메뉴와 본문) end -->
<!--footer(하단)-->
<div class="site-footer">
<div class="container">
<div class="copyright clearfix">
<p>
<b>IOT AMDIN SYSTEM</b>
</p>
<p>Copyright © ine.gachon.ac.kr 2023</p>
</div>
</div>
</div>
<!--footer(하단) end-->
<div class="loading-overlay">
<img src="static/image/Spinner-1s-200px.gif" alt="Loading" class="loading-image">
</div>
</body>
{% include 'common/js_fun.html' %}
{% include 'common/js_init.html' %}
<script src="static/lib/js/socket.io-3.0.1.min.js"></script>
<script>
$(function() {
//소켓아이오 js
////////////////////////////////////////////////////////////////////////////
socket = io({
transports : [ 'websocket' ]
});
socket.on('connect', function() {
console.log('소켓 접속 완료');
//alertShow('socket connection complete');
});
socket.on('disconnect', function() {
console.log('소켓 접속 종료');
});
});
</script>
<script src="https://cdn.jsdelivr.net/npm/chart.js"></script>
<script src="https://cdn.jsdelivr.net/npm/raphael/raphael.min.js"></script>
<script src="https://cdn.jsdelivr.net/npm/justgage/justgage.js"></script>
<script type="text/javascript" src="static/lib/js/jquery.dataTables.min.js"></script>
<script type="text/javascript" src="static/lib/js/dataTables.bootstrap.min.js"></script>
<script type="text/javascript" src="static/lib/js/piano.js"></script>
<script src="static/user/js/system_info.js?var={{rand}}"></script>
<script>
alertShow('');
// 차트 설정
const ctx = document.getElementById('tempChart').getContext('2d');
const tempChart = new Chart(ctx, {
type: 'line',
data: {
labels: [], // 빈 레이블 배열
datasets: [{
label: '온도 (°C)',
backgroundColor: 'rgba(255, 99, 132, 0.2)',
borderColor: 'rgba(255, 99, 132, 1)',
data: []
}, {
label: '습도 (%)',
backgroundColor: 'rgba(54, 162, 235, 0.2)',
borderColor: 'rgba(54, 162, 235, 1)',
data: []
}]
},
options: {
scales: {
y: {
beginAtZero: false
}
}
}
});
$(function(){
// 최초 데이터 요청
socket.emit('get_temperature', {});
socket.on('ret_temperature', function(data) {
console.log("온도",data)
const now = new Date();
const timeLabel = `${now.getHours()}:${now.getMinutes()}:${now.getSeconds()}`;
const temperature = data.temperature
const humidity = data.humidity
if(!(temperature == 0 && humidity == 0)){
if (tempChart.data.labels.length > 20) {
tempChart.data.labels.shift(); // 레이블 배열에서 첫 번째 요소 제거
tempChart.data.datasets.forEach((dataset) => {
dataset.data.shift(); // 데이터셋에서 첫 번째 데이터 제거
});
}
tempChart.data.labels.push(timeLabel);
tempChart.data.datasets[0].data.push(temperature);
tempChart.data.datasets[1].data.push(humidity);
tempChart.update();
}
});
})
// 더미 데이터 생성 및 차트 업데이트
setInterval(() => {
const now = new Date();
const timeLabel = `${now.getHours()}:${now.getMinutes()}:${now.getSeconds()}`;
const temperature = (Math.random() * 10) + 20; // 20°C ~ 30°C 사이의 온도
const humidity = (Math.random() * 50) + 50; // 50% ~ 100% 사이의 습도
if (tempChart.data.labels.length > 20) {
tempChart.data.labels.shift(); // 레이블 배열에서 첫 번째 요소 제거
tempChart.data.datasets.forEach((dataset) => {
dataset.data.shift(); // 데이터셋에서 첫 번째 데이터 제거
});
}
tempChart.data.labels.push(timeLabel);
tempChart.data.datasets[0].data.push(temperature);
tempChart.data.datasets[1].data.push(humidity);
tempChart.update();
}, 1000); // 1초마다 데이터 업데이트
</script>
</html>
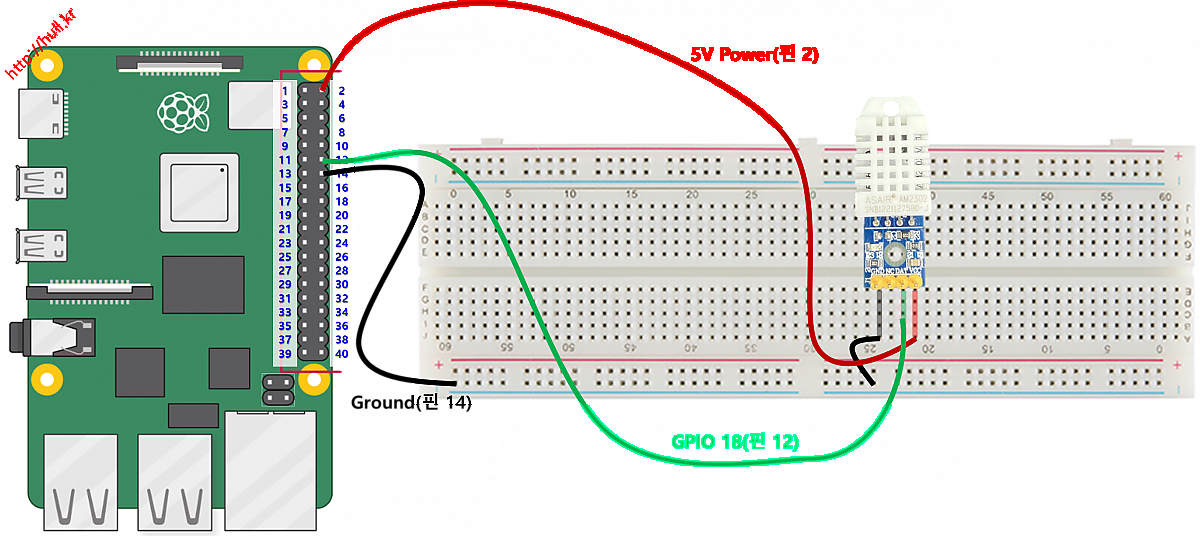
라즈베리파이 GPIO 설치 및 온습도 측정 실습 참조
- 링크를 참조 하여 GPIO 구성 및 LED 설치
- /home/pi/iot/socket_events.py
- 기존 코드에 온습도 데이터 서버 요청 처리 코드 추가
- @sio.on('get_temperature')
async def on_get_temperature(sid, data):
await start_temperature(sio, sid)
#data['state'] = await temperature_state()
#socket_events.py
from common import get_system_info, sio  # common.py에서 get_system_info 함수, sio 변수를 가져옵니다.
from gpio_3_color_led import start_rgb_3color_leds, stop_rgb_3color_leds, rgb_3color_leds_state

@sio.event
async def connect(sid, environ):
    print('클라이언트 연결', sid)

@sio.event
async def disconnect(sid):
    print('클라이언트 종료', sid)

@sio.on('get_system_info')
async def on_get_system_info(sid, data):
    #print("클라이언트에서 받은 data", data)
    systemInfo = get_system_info()
    await sio.emit('ret_system_info', systemInfo, room=sid)

@sio.on('set_3color_led')
async def on_set_3color_led(sid, data):
    print("set_3color_led", data)
    if data['data'] == 'on':
        await start_rgb_3color_leds()
    elif data['data'] == 'off':
        print("led 스위치 off", data)
        await stop_rgb_3color_leds()
    data['state'] = await rgb_3color_leds_state()
    await sio.emit('ret_3color_led', data, room=sid)

@sio.on('get_3color_led')
async def on_get_3color_led(sid, data):
    data['state'] = await rgb_3color_leds_state()
    await sio.emit('ret_3color_led', data, room=sid)

#추가 내용
@sio.on('get_temperature')
async def on_get_temperature(sid, data):
    await start_temperature(sio, sid)
    #data['state'] = await temperature_state()
- /home/pi/iot/iot_server.py
- 기존 메인 프로그램 코드에 http 요청 코드 추가
- app.router.add_get('/temperature', temperatureHandle) #http://172.16.237.107:5000/temperature
- 기존 메인 프로그램 코드에 http 요청 코드 추가
from setting import SETTING
#import socket
#import socketio #pip install python-socketio
import secrets
import asyncio
#import aiohttp #pip install aiohttp
#from aiohttp import web
from aiohttp_session import setup #pip install aiohttp_session
from aiohttp_session.cookie_storage import EncryptedCookieStorage #pip install cryptography
#from jinja2 import Environment, FileSystemLoader #pip install Jinja2
import json
#import genId #pip install genId
#import psutil #pip install psutil
#import subprocess
from common import web, app  # socket_events.py에서 sio 인스턴스를 가져옵니다.
from request_handlers import mainHandle, temperatureHandle  # request_handlers.py에서 mainHandle 함수를 가져옵니다.
import socket_events
# 암호화 키 설정
SETTING['SECRET_KEY'] = secrets.token_bytes(32)
# 세션 미들웨어 설정
setup(app, EncryptedCookieStorage(SETTING['SECRET_KEY'], cookie_name=SETTING['COOKIE_NAME']))
async def web_server():
    app.router.add_static('/static/', path='static/', name='static') #리소스 위치
    app.router.add_get('/', mainHandle) #http://172.16.237.107:5000
    #app.router.add_get('/login', loginHandle) #http://172.16.237.107:5000/login
    #추가 내용
    app.router.add_get('/temperature', temperatureHandle) #http://172.16.237.107:5000/temperature

    runner = web.AppRunner(app)
    await runner.setup()
    site = web.TCPSite(runner, '0.0.0.0', 5000) # http://본인아이피:5000
    await site.start()
async def main():
    try:
        await web_server()  # 웹 서버 시작
        # 무한 루프로 서버가 계속 실행되도록 유지
        while True:
            await asyncio.sleep(3600)  # 예시로, 1시간마다 대기를 풀고 다시 대기함
    except KeyboardInterrupt:
        print("프로그램이 사용자에 의해 종료됨.")
    except Exception as e:
        print(f"예외 발생: {e}")

if __name__ == '__main__':
    asyncio.run(main())
- /home/pi/iot/request_handlers.py
- 기존 코드에 http 요청 처리 코드 추가
- async def temperatureHandle(request):
return response_html('temperature.html')
- async def temperatureHandle(request):
- 기존 코드에 http 요청 처리 코드 추가
from common import response_html
async def mainHandle(request):
    return response_html('index.html')
#추가 내용
async def temperatureHandle(request):
    return response_html('temperature.html')
async def loginHandle(request):
    return response_html('login.html')
- /home/pi/iot/gpio_temperature.py
- 온습도 센서를 이용한 온습도 측정 파이썬 코드 생성
import board
import adafruit_dht
import asyncio
import time
import threading
# DHT22 센서 설정 (GPIO 18)
dht_device = adafruit_dht.DHT22(board.D18)
# 스레드 중지를 위한 플래그
is_temperature = False
temperature_thread = None
humidity = 0
humidity = 0

async def send_temperature_data(sio, data, sid):
    #클라이언트한테 수신(비동기)
    await sio.emit('ret_temperature', data, room=sid)
def cycle_temperature(sio, sid):
    global is_temperature, temperature_thread

    while is_temperature :
        try:
            # 센서에서 온도와 습도 읽기
            temperature = dht_device.temperature
            humidity = dht_device.humidity
            # 데이터 출력
            if humidity is not None and temperature is not None:
                print(f'온도: {temperature:.1f}°C')
                print(f'습도: {humidity:.1f}%')
            else:
                humidity = 0
                temperature = 0
            data = {
                "humidity" : humidity,
                "temperature" : temperature
            }
            loop = asyncio.new_event_loop()
            asyncio.set_event_loop(loop)
            # 이벤트 루프 내에서 비동기 함수 실행
            try:
                loop.run_until_complete(send_temperature_data(sio, data, sid))
            finally:
                loop.close()
        except RuntimeError as error:
            # 센서에서 데이터를 읽는 중 오류 발생 처리
            print(error.args[0])

        except Exception as error:
            dht_device.exit()
            raise error
        # 10초 동안 대기
        time.sleep(2)
async def start_temperature(sio, sid):
    global is_temperature, temperature_thread
    if temperature_thread is None or not temperature_thread.is_alive():
        is_temperature = True
        temperature_thread = threading.Thread(target=cycle_temperature, args=(sio, sid))
        temperature_thread.start()


댓글목록0